アイキャッチは、設定しないと普通は表示されません。ここでは投稿の最初に入れた画像を自動でアイキャッチに設定する方法を書きたいと思います。
プラグインを使う
プラグインを使うとなると、「Auto Post Thumbnail」あたりが有名かと思います。
プラグインなしの場合
functions.phpに命令を書きます。
寝ログのわいひらさんがソースを公開してくださっています。これを読めば解決です!
コピペ一発でWordPressの投稿時にアイキャッチを自動設定させるカスタマイズ方法(YouTube対応版)
ちなみに【Simplicity2】ではアイキャッチを自動で設定できる仕組みが最初から用意されています。便利ですね!
念のためソースを書いておきます。これをfunctions.phpに追加します。
/////////////////////////////////////////////
//コピペ一発でWordpressの投稿時にアイキャッチを自動設定するカスタマイズ方法(YouTube対応版)
//http://nelog.jp/auto-post-thumbnail-custum
/////////////////////////////////////////////

//WP_Filesystemの利用
require_once(ABSPATH . '/wp-admin/includes/image.php');

//イメージファイルがサーバー内にない場合は取得する
function fetch_thumbnail_image($matches, $key, $post_content, $post_id){
  //サーバーのphp.iniのallow_url_fopenがOnでないとき外部サーバーから取得しない
  if ( !ini_get('allow_url_fopen') )
    return null;
  //正しいタイトルをイメージに割り当てる。IMGタグから抽出
  $imageTitle = '';
  preg_match_all('/<\s*img [^\>]*title\s*=\s*[\""\']?([^\""\'>]*)/i', $post_content, $matchesTitle);

  if (count($matchesTitle) && isset($matchesTitle[1])) {
    if ( isset($matchesTitle[1][$key]) )
      $imageTitle = $matchesTitle[1][$key];
  }

  //処理のためのURL取得
  $imageUrl = $matches[1][$key];

  //ファイル名の取得
  $filename = substr($imageUrl, (strrpos($imageUrl, '/'))+1);

  if (!(($uploads = wp_upload_dir(current_time('mysql')) ) && false === $uploads['error'])){
    return null;
  }

  //ユニック(一意)ファイル名を生成
  $filename = wp_unique_filename( $uploads['path'], $filename );

  //ファイルをアップロードディレクトリに移動
  $new_file = $uploads['path'] . "/$filename";

  if (!ini_get('allow_url_fopen')) {
    return null;
    //$file_data = curl_get_file_contents($imageUrl);
  } else {
    if ( WP_Filesystem() ) {//WP_Filesystemの初期化
      global $wp_filesystem;//$wp_filesystemオブジェクトの呼び出し
      //$wp_filesystemオブジェクトのメソッドとしてファイルを取得する
      $file_data = @$wp_filesystem->get_contents($imageUrl);
    }
  }

  if (!$file_data) {
    return null;
  }

  if ( WP_Filesystem() ) {//WP_Filesystemの初期化
    global $wp_filesystem;//$wp_filesystemオブジェクトの呼び出し
    //$wp_filesystemオブジェクトのメソッドとしてファイルに書き込む
    $wp_filesystem->put_contents($new_file, $file_data);
  }

  //ファイルのパーミッションを正しく設定
  $stat = stat( dirname( $new_file ));
  $perms = $stat['mode'] & 0000666;
  @ chmod( $new_file, $perms );

  //ファイルタイプの取得。サムネイルにそれを利用
  $mimes = null;
  $wp_filetype = wp_check_filetype( $filename, $mimes );

  extract( $wp_filetype );

  //ファイルタイプがない場合、これ以上進めない
  if ( ( !$type || !$ext ) && !current_user_can( 'unfiltered_upload' ) ) {
      return null;
  }

  //URLを作成
  $url = $uploads['url'] . "/$filename";

  //添付(attachment)配列を構成
  $attachment = array(
    'post_mime_type' => $type,
    'guid' => $url,
    'post_parent' => null,
    'post_title' => $imageTitle,
    'post_content' => '',
  );

  $file = false;
  $thumb_id = wp_insert_attachment($attachment, $file, $post_id);
  if ( !is_wp_error($thumb_id) ) {
    //attachmentのアップデート
    wp_update_attachment_metadata( $thumb_id, wp_generate_attachment_metadata( $thumb_id, $new_file ) );
    update_attached_file( $thumb_id, $new_file );

    return $thumb_id;
  }

  return null;
}

//投稿内の最初の画像をアイキャッチに設定する(Auto Post Thumnailプラグイン的な機能)
function auto_post_thumbnail_image() {
  global $wpdb;
  global $post;
  //$postが空の場合は終了
  if ( isset($post) && isset($post->ID) ) {
    $post_id = $post->ID;

    //アイキャッチが既に設定されているかチェック
    if (get_post_meta($post_id, '_thumbnail_id', true) || get_post_meta($post_id, 'skip_post_thumb', true)) {
        return;
    }

    $post = $wpdb->get_results("SELECT * FROM {$wpdb->posts} WHERE id = $post_id");

    //正規表現にマッチしたイメージのリストを格納する変数の初期化
    $matches = array();

    //投稿本文からすべての画像を取得
    preg_match_all('/<\s*img [^\>]*src\s*=\s*[\""\']?([^\""\'>]*).+?\/?>/i', $post[0]->post_content, $matches);
    //var_dump($matches);
    //YouTubeのサムネイルを取得(画像がなかった場合)
    if (empty($matches[0])) {
      preg_match('%(?:youtube\.com/(?:user/.+/|(?:v|e(?:mbed)?)/|.*[?&]v=)|youtu\.be/)([^"&?/ ]{11})%i', $post[0]->post_content, $match);
      if (!empty($match[1])) {
        $matches=array(); $matches[0]=$matches[1]=array('http://img.youtube.com/vi/'.$match[1].'/mqdefault.jpg');
      }
    }

    if (count($matches)) {
      foreach ($matches[0] as $key => $image) {
        $thumb_id = null;
        //画像がイメージギャラリーにあったなら、サムネイルIDをCSSクラスに追加(イメージタグからIDを探す)
        preg_match('/wp-image-([\d]*)/i', $image, $thumb_id);
        if ( isset($thumb_id[1]) )
          $thumb_id = $thumb_id[1];

        //サムネイルが見つからなかったら、データベースから探す
        if (!$thumb_id &&
           //画像のパスにサイト名が含まれているとき
           ( strpos($image, site_url()) !== false ) ) {
          //$image = substr($image, strpos($image, '"')+1);
          preg_match('/src *= *"([^"]+)/i', $image, $m);
          $image = $m[1];
          if ( isset($m[1]) ) {
            //wp_postsテーブルからguidがファイルパスのものを検索してIDを取得
            $result = $wpdb->get_results("SELECT ID FROM {$wpdb->posts} WHERE guid = '".$image."'");
            //IDをサムネイルをIDにセットする
            if ( isset($result[0]) )
              $thumb_id = $result[0]->ID;
          }

          //サムネイルなどで存在しないときはフルサイズのものをセットする
          if ( !$thumb_id ) {
            //ファイルパスの分割
            $path_parts = pathinfo($image);
            //サムネイルの追加文字列(-680x400など)を取得
            preg_match('/-\d+x\d+$/i', $path_parts["filename"], $m);
            //画像のアドレスにサイト名が入っていてサムネイル文字列が入っているとき
            if ( isset($m[0]) ) {
              //サムネイルの追加文字列(-680x400など)をファイル名から削除
              $new_filename = str_replace($m[0], '', $path_parts["filename"]);
              //新しいファイル名を利用してファイルパスを結語
              $new_filepath = $path_parts["dirname"].'/'.$new_filename.'.'.$path_parts["extension"];
              //wp_postsテーブルからguidがファイルパスのものを検索してIDを取得
              $result = $wpdb->get_results("SELECT ID FROM {$wpdb->posts} WHERE guid = '".$new_filepath."'");
              //IDをサムネイルをIDにセットする
              if ( isset($result[0]) )
                $thumb_id = $result[0]->ID;
            }
          }
        }


        //それでもサムネイルIDが見つからなかったら、画像をURLから取得する
        if (!$thumb_id) {
          $thumb_id = fetch_thumbnail_image($matches, $key, $post[0]->post_content, $post_id);
        }

        //サムネイルの取得に成功したらPost Metaをアップデート
        if ($thumb_id) {
          update_post_meta( $post_id, '_thumbnail_id', $thumb_id );
          break;
        }
      }
    }
  }
}
//新しい投稿で自動設定する場合
add_action('save_post', 'auto_post_thumbnail_image');
add_action('draft_to_publish', 'auto_post_thumbnail_image');
add_action('new_to_publish', 'auto_post_thumbnail_image');
add_action('pending_to_publish', 'auto_post_thumbnail_image');
add_action('future_to_publish', 'auto_post_thumbnail_image');
add_action('xmlrpc_publish_post', 'auto_post_thumbnail_image');
だいぶ長いですね。functions.phpが長くなるのについては特に問題はありませんが、新たにほかの命令を追加したりしたい場合に最後がどこだったかわからなくなったり、またはプラグインを使うことになり、消したい時にどこからどこまでだったけ?ということが起こることもあると思います。ちょっと時間が経ってしまうと忘れてしまいますよね・・・。
その場合は、ソースを分けてfunctions.phpに読み込ませるという方法があります。
functions.phpから別のphpを読み込む
下記にその方法を書いていますので、読んでみてください。
わかりやすく今回は、autopost_thumbnail.phpとでもしておきましょう。
テキストエディタなどを開いて、上記の命令をコピペし、libというフォルダを作りautopost_thumbnail.phpという名前で保存します。
/lib/autopost_thumbnail.phpです。
コピペするときは、一番上に
<?php
を入れ忘れないようにしましょう。一番上です。
<?php
/////////////////////////////////////////////
//コピペ一発でWordpressの投稿時にアイキャッチを自動設定するカスタマイズ方法(YouTube対応版)
//http://nelog.jp/auto-post-thumbnail-custum
/////////////////////////////////////////////
できたらautopost_thumbnail.phpの保存は子テーマがよいと思います。
子テーマのfunctions.phpに下記のような命令を追加します。
locate_template('lib/autopost_thumbnail.php', true);これでOKです。試しにテスト投稿をして、最初に画像をメディアから入れます。アイキャッチに同じ画像が入ると思います。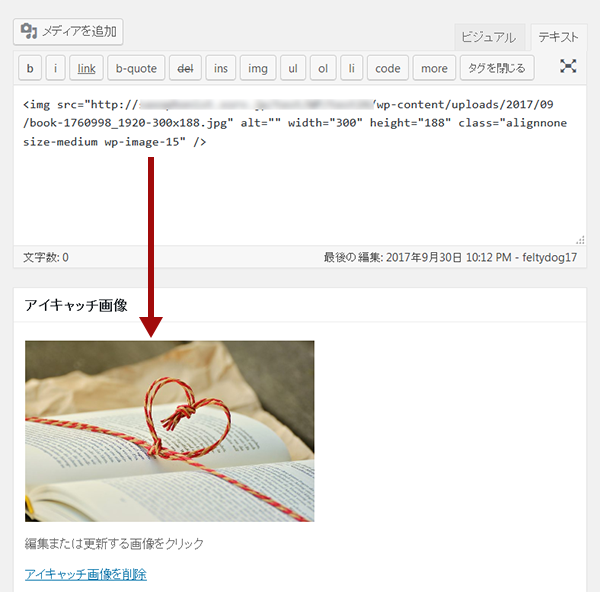

コメントをどうぞ